RSR Docker Development Environment
Additionally supported IDEs:
System architecture
![@startuml
rectangle google as "Google Cloud" {
rectangle k8s as "GKE" {
node ingress as "Ingress"
node pod as "RSR pod" {
node nginx as "Nginx" {
file localassets as "web assets"
}
node backend as "Backend"
node cloudsql_proxy as "cloudsql proxy"
node worker as "Task Worker"
node reportserver as "Report Server"
}
node memcachedpod as "Memcached pod" {
node memcached as "Memcached"
}
}
rectangle storage as "Google Storage" {
storage bucket as "Partner assets bucket"
}
rectangle sqlcloud as "Google SQL Cloud" {
database db as "PostgreSQL"
}
nginx --> reportserver
nginx --> backend
backend --> bucket
backend --> cloudsql_proxy
cloudsql_proxy --> db
backend -[dashed]> memcached
worker --> cloudsql_proxy
worker -[dashed]> memcached
reportserver -[dashed]> memcached
reportserver --> db
}
actor iati as "IATI Registry"
iati -[#0000FF]-> ingress : https://rsr.akvo.org/...
actor browser as "Website"
browser -[#0000FF]-> ingress : https://rsr.akvo.org/...
ingress --> nginx
actor mobile as "Mobile app"
mobile -[#0000FF]-> ingress : https://rsr.akvo.org/...
actor partnersite as "Partner site"
partnersite -[#0000FF]-> ingress : https://partner.akvoapp.org/...
actor apiclients as "API clients"
apiclients -[#0000FF]-> ingress : https://rsr.akvo.org/...
@enduml](_images/plantuml-366b6f1b46d3d4ab9eb38ecc00d7873127bfc557.png)
System setup
Install
dockerInstall
docker-compose
Starting Up
Clone the repository
git clone https://github.com/akvo/akvo-rsr.git && cd akvo-rsrRun
docker-compose up --buildVisit http://localhost/
Development
Code Linting
We run lint checks on CI. To run them locally, you can run the following command:
docker-compose exec -u akvo web ./scripts/devhelpers/lint.sh
Generating documentation
We use sphinx for documentation. This also allows us to generate reference documentation.
# Generate doc with reference documentation
make USE_DOCKER=1 full-doc
# Generate API reference RSTs
make USE_DOCKER=1 api
# Generate HTML from RSTs and Markdown in doc/
make USE_DOCKER=1 html
Should you have everything installed locally, you can use make $target and docker will not be used.
The reference documentation is generated with the api target, while the html target converts it all into HTML.
You can then open it with your favorite browser from public/html/index.html.
xdg-open public/html/index.html will open it with your default browser on linux.
Tests
When the local server is running, you can run the following command in a separate terminal to run the tests.
docker-compose exec web ./manage.py test --keepdb -v 3 akvo.rsr.tests.test_templatetags
-vmakes the output of the tests verbose--keepdbkeeps the database between consecutive test runs, so that migrations needn’t be run each time (which take a long time!)
Coverage
It may be good to know which portions of the code we have covered.
scripts/devhelpers/coverage.sh
This will run the tests and output the coverage information to stdout, HTML, and XML.
The XML can be used by certain service and some IDEs (e.g PyCharm) to interactively show coverage
while browsing the source files.
Otherwise, you can always browse the HTML at coverage/report/index.html.
The coverage of the diff between your branch and master will also be available at
coverage/diff.html.
You can use this to show which parts of the new code you wrote are covered.
End-to-end testing
We use Jest and Puppeteer for the End-to-end testing.
It will run tests against containers running on localhost started by docker-compose up command.
Tests can be run in a local environment (requires node to be installed) or can be run in a containerized
environment (supported on Linux only).
To run the tests in local environment
./scripts/devhelpers/run-e2e-local.sh
You can disable Puppeteer’s headless mode and launch the browser
HEADLESS=false ./scripts/devhelpers/run-e2e-local.sh
To run the tests in containerized environment
./scripts/devhelpers/run-e2e-linux.sh
Running tests with headless mode disabled is not supported in containerized environment.
The E2E test will be run when you run the script to promote to production to ensure the application runs properly. It will be run in the containerized environment when running on Linux in headless mode, otherwise, it will be run in the local environment.
Front-end assets
Front-end assets are managed by webpack. For production deployments, webpack builds the assets required. For development, we automatically run a webpack watcher that rebuilds anything that needs to be.
Performance improvements
As the data in RSR is growing, we will discover code paths that are slow, and
can be optimized. The fixes are usually small - a few missing select_related
and prefetch_related calls. But, how do we go about finding out why a
particular page is slow to load, or an API endpoint is slow to respond?
The Django Debug Toolbar along with the Network tab of the Developer console will take you a long way in solving performance issues.
Network tab - Developer Console
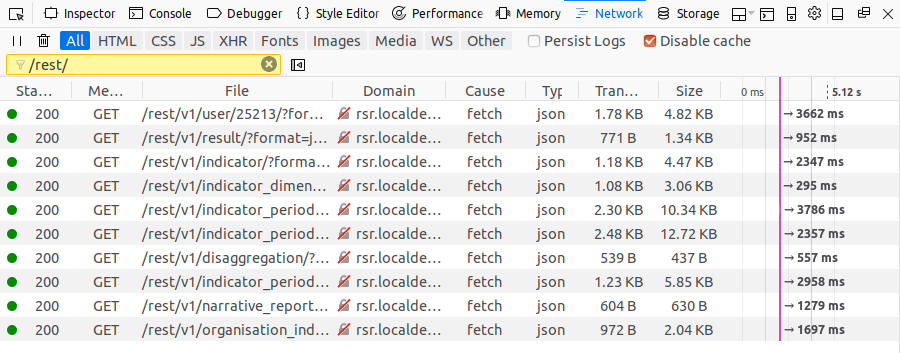
The developer console can help you see coarsely, the amount of time each request from the page takes. If a page has multiple API requests to fetch the relevant data, you could identify which one takes the longest, etc., from here.

Django debug toolbar
The Django Debug Toolbar (DDT) comes with a bunch of panels to display information about the currently displayed view, a bunch of information being quite useful to debug performance issues.
You can enable/configure it in 50-docker-local-dev.conf.
Debugging performance issues

The Time, SQL and Cache panel are particularly of interest when debugging performance related issues.
NOTE: All the information takes into account only the actions performed within the Django view being used to render the current page. None of the AJAX requests on that page are included into the statistics displayed by DDT.
Debugging slow AJAX calls
DDT is quite effective in finding reasons for slowness within the view that’s rendering the current page, but apparently not very helpful for debugging performance issues within the AJAX calls made on the page. How do we debug these?
First, use the Network tab of the Developer console to figure out which AJAX calls are slowing things down.
Then, use the Django Debug Toolbar on the Django Rest Framework UI! For the slow request identified above, right click and copy the URL and open it in a new tab, without the
format=jsonorformat=xmlargument to load up the DRF UI. If you have DDT enabled, it should show up on this page with the statistics for the end-point in question.Debug and improve performance
Profit!
Development Workflow
We use a branch and PR based development model.
masterbranch is the default branch of the repository. Any new commits on this branch are deployed to the test server, automatically.Any code being committed onto
mastershould go through a pull-request and code-review process.
Git branches workflow
Create a new branch for every issue/feature you are working on.
Name the branch
feature/1234-featurenamewhere #1234 is the issue numberWhen you have code ready to be merged, create a Pull Request from the Branch to merge into
master.Make commits in the format:
[#1234] Fix problem with broken dependencies
This will ensure the commits are “linked” to the issues.
When an issue is completely fixed, add
Fixes #1234in the commit message, to automatically close the issue when the PR is merged.
i18n Translations
Process
Add the tags to all strings within RSR that should be translated
Generate the .po file from Django (
python manage.py makemessages)Upload the .po file into the Transifex interface
Select the languages to be supported with the translations
Assign translators to a language, assuring that every language is covered
Translators perform the work and submit the translated strings into transifex
Ensure all languages completed and approved
Download the new .po files for each language
Add these into the RSR Codebase
Run
python manage.py compilemessagesto generate.mofiles from the.pofiles, which are used by Django’s built-in gettext support.
This process works the same way whether for RSR or for RSR Up - however for Up, we do not use .po files but an alternative Android format, the process otherwise remains the same.
Notes for developers
When tagging for translation there are some things that will make life a lot easier for translators.
Avoid “ (double quotes) within a string marked for translation. Use ‘ (single quotes) where ever possible instead since “ is escaped to “ in the .po file. This gotcha is common when HTML tags are part of the translation string. Example, write:
By <a href='{{ register1_url }}'>registering</a> with Akvo, you will be able to:
Keep text in {% blocktrans %} on one line, including the blocktrans tag itself. This is because otherwise all the whitespace is included in the translation text. This is especially painful if combined with tabs for indenting.
Use dictionaries for string interpolation with dict keys that explain the meaning of the inserted value. This also allows for re-ordering of the inserted values. Example:
msg = u'Invoice %(invoice_id)d could not be voided. It is already %(invoice_status)s.' % dict(
    invoice_id=invoice.pk, invoice_status=invoice.get_status_display().lower()
)
is much better than:
msg = u'Invoice %d could not be voided. It is already %s.' % (
    invoice.pk, invoice.get_status_display().lower()
)
As little HTML inside {% blocktrans %} as possible. Some HTML can’t be avoided though. Use string interpolation in code to “inject” the translation string into a wrapping html tag:
{
    'description: u'<p style="margin-left:0; padding-left:0; margin-top:1em; width:75%%;">%s</p>' % _(
        u'In-depth information about your project should be put in this section. '
        u'Use the Background, Project plan, Current status and Sustainability fields '
        u'to tell people more about the project.'
    )
}
Here is also shown the use of python’s automatic concatenation of multiple single line strings into one long string.
Translation in RSR (in JSX) is done in the following manner:
In the JSX views we encapsulate strings in this manner
t('Program overview').Then, periodically we collect these strings by going to
cd akvo/rsr/spa/translationsand runnode extract.jswhile docker is running.This will populate the file
strings.pywith the new strings to be added.The entire content of this file then should be manually added to
akvo/rsr/views/translations.py.
Note for translators
If the referenced document is a .html file or it’s obvious that the text is used in a web context (tags in the text is a giveaway) all extra whitespace can be ignored, particularly \n (newline) and \t (tab) characters that may appear in certain cases. However in a few cases, e.g. email templates formatting of this type may be relevant. Those files usually end in .txt
FAQ
Q: How do I migrate or get a Django shell?
You can exec commands on the web host. docker-compose exec -u akvo web python manage.py shell for example.
Q: How do I access a partnersite?
You will need to add an entry to your /etc/hosts file (or Windows equivalent),
and point <partner_hostname>.localakvoapp.org to 127.0.0.1 - for example,
add this line to be able to access the EUTF partner site:
127.0.0.1 eutf.localakvoapp.org
Q: How do I update the Python package dependencies?
To temporarily install additional packages in the docker machine, you can run
docker-compose exec web pip install <package_name>. Note that this
installation is temporary, and all changes are lost when docker-compose down
is run.
To install add a new dependency, see the instructions in the scripts/devhelpers/update-locked-requirements file.
Q: I get a 502! Why?
Ensure that RSR is running. Chances are, a 502 means that no RSR app is running.
Q: How do create a copy of the test/live DB for local testing?
See the instructions in the scripts/data/make-and-restore-production-dump.sh file.
Helpful notes
When you are done developing, run
docker-compose down -vto stop and remove containers, networks, and volumes.Run
docker-compose exec -u akvo web /bin/bashto get a shell on the docker web container.The
akvo-rsrrepository from your local machine is mounted to the docker container, and the RSR application will restart when you make code changes.
Useful scripts
There are a variety of useful scripts in scripts/devhelpers.